

How To Make Window Clings At Home
Kylyssa Shay worked every bit a florist for eighteen years and has created and taught an assortment of crafts to adults and children of all ages.

DIY Bloody Handprints for Halloween
What gruesome political party couldn't use a few bloody handprints with drops of blood on the walls or windows as a decoration? These like shooting fish in a barrel-to-brand clings stick on windows, mirrors, or whatever other glass or plastic surface—and they're cheap, too! There are a ton of great ways you can incorporate them:
- Use them on the floors at the "criminal offense scene" of a murder-mystery party.
- Identify them on the shower curtains for a Psycho moving picture marathon.
- Put them on the mirrors just for fun, to scare someone.
- Use them for whatsoever Halloween-related gathering or event, of class!
Yous can make inexpensive, reusable window cling decorations for any bloody occasion. A lot of people simply buy premade decorations with a gory theme and put them upward. For me, that takes a lot of the fun out of decorating my home. That'south why I thought it would be fun to create a budget-friendly craft project that produces unique looking bloody handprint window cling decorations and false blood drops. This article will lay out all the steps yous need—have fun!
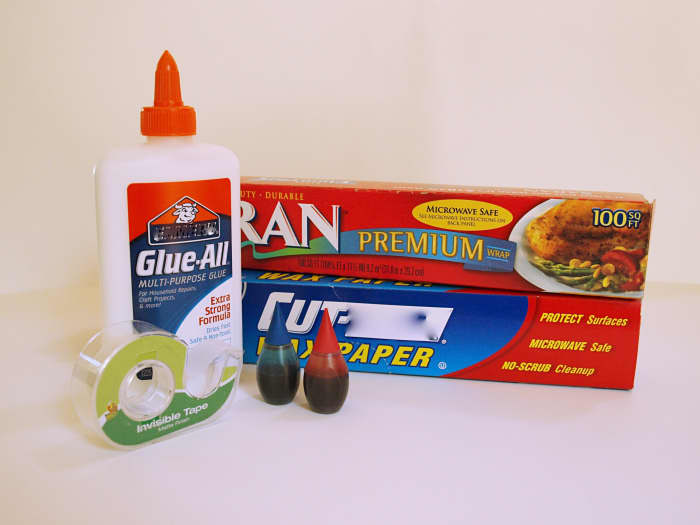
What You Need to Brand Bloody Handprint Window Clings
- Elmer's Glue-All, craft gum, or a generic equivalent. (A four-ounce bottle of glue will brand well-nigh four adult-sized encarmine handprint window clings and numerous claret drops or small-scale pools of blood.)
- Red nutrient coloring
- Blue food coloring
- Plastic saran wrap
- Wax paper
- A large cut board, clipboard, or piece of foam core board
- Tape
- Optional: Latex or not-latex surgical gloves*
While y'all'll probably discover the food coloring at a grocery store, the craft glue, plastic wrap, and wax paper are also often available at dollar stores.
A Note on the Gloves: If you lot do this arts and crafts project without gloves, yous volition stain your easily with blood-red nutrient dye. However, blank hands are the easiest to work with and the gloves may make for a somewhat messier finished projection and work expanse. I personally prefer to utilize my bare hands — it gives me more control and the dye goes away afterwards about a solar day. If you use a hand lotion to moisturize your hands before y'all start the project, the dye will come off easier.
Step One: Gear up Your Work Expanse
Before y'all start mixing upwardly the fake blood and showtime making the clings, yous'll need to prepare your work expanse. This is important, as this tin be a messy projection — peculiarly if you get children involved (and, you lot should! As long equally you apply non-toxic gum, this can exist fun and perfectly condom for kids).
- Prepare your piece of work area on a washable surface, preferably in a room with a smoothen, washable floor.
- Wrap the plastic wrap carefully effectually the cutting board, clipboard, or the slice of foam core lath very carefully so that surface is completely smoothen. This is actually the hardest chore involved in the whole project.
- Secure the plastic wrap with tape on the back side of whatever lath yous are using. I used a square slice of countertop material that I use to brand crafts on. No matter what you apply to keep the plastic wrap in place, be sure that information technology holds it securely.
I'd also suggest wearing a smock to cover up with or wearing quondam clothes you don't listen staining for both the adults and children taking part in this project.
Stride Two: Mix Upwards the Colored Glue
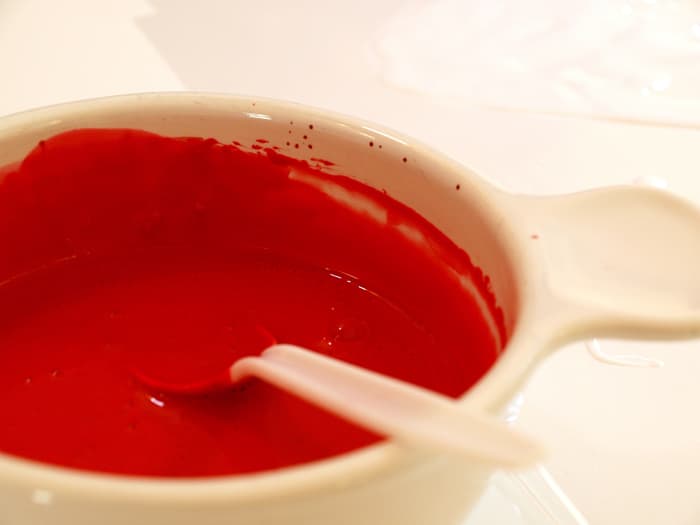
- Cascade well-nigh an ounce of arts and crafts gum into a modest bowl or loving cup and add a single small drop of blue food coloring to it.
- Stir the blue food coloring in well and, while doing so, add the ruby nutrient coloring one driblet at a time. Stir thoroughly between drops, until the mixture reaches a shade just lighter than yous want the finished product to be. The mixture will become darker and more translucent when information technology dries. If you become it too dark, that's OK — it will probably exist more than realistic because the real stuff is much darker than most commercially available fake blood and movie blood.
I recommend making just an ounce of the glue mixture to beginning. This allows y'all to tweak and adjust the color to your preferences. Once you get the hang of coloring the glue to encarmine perfection, you can mix it directly in the glue bottle to reduce the mess and brand for easier application.
Step Iii: Press the Glue onto the Plastic Wrap
Ringlet to Continue
Read More From Feltmagnet
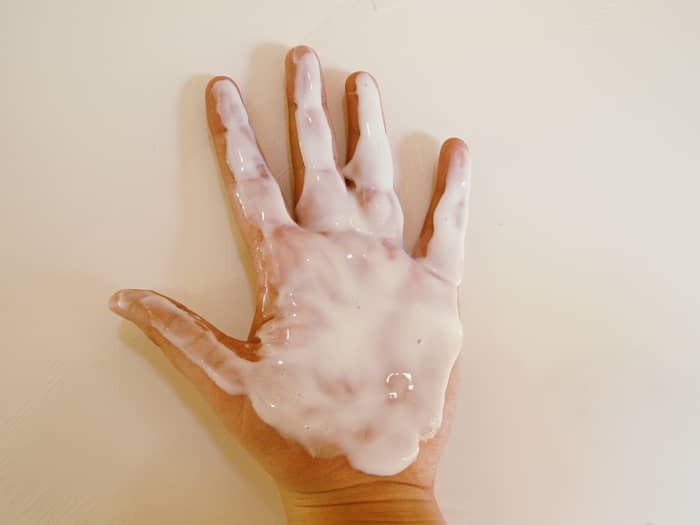
This step will provide a base for each print. Yous will become your manus covered in craft gum, so if that is a trouble, you will want to wear the latex or non-latex surgical glove here.
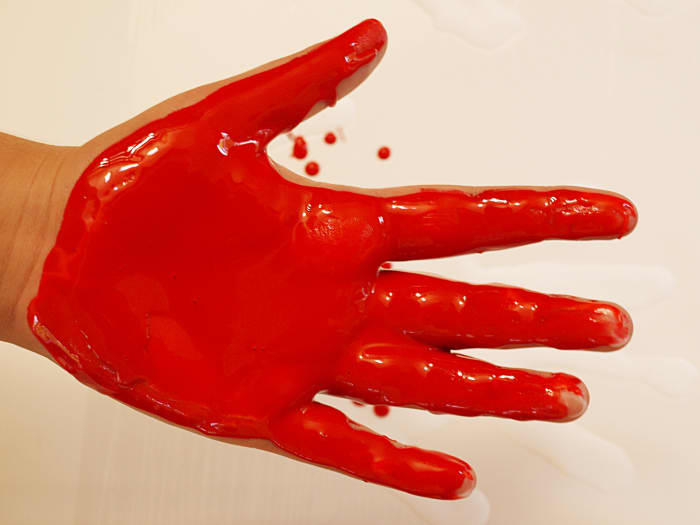
- Coat your paw in craft glue, equally pictured above.
- Printing it downward on the plastic wrap, leaving a white craft gum manus print on it. This is where y'all'll see why it was so important to secure that plastic wrap!
- Repeat the pressing as many times as you can easily fit on your stretched-smooth plastic wrap.
- Fill in the shape of the hand in each print with more arts and crafts mucilage to a thickness of about an eighth of an inch.
- Set aside to dry.
Also, make sure that you launder your hands, and the glove if you used one, in warm soapy water.
This step will provide a base for each print.
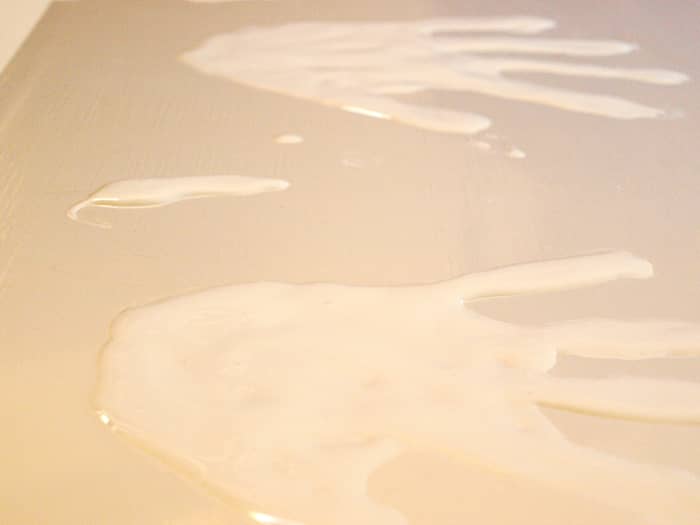
Your plain glue bases.
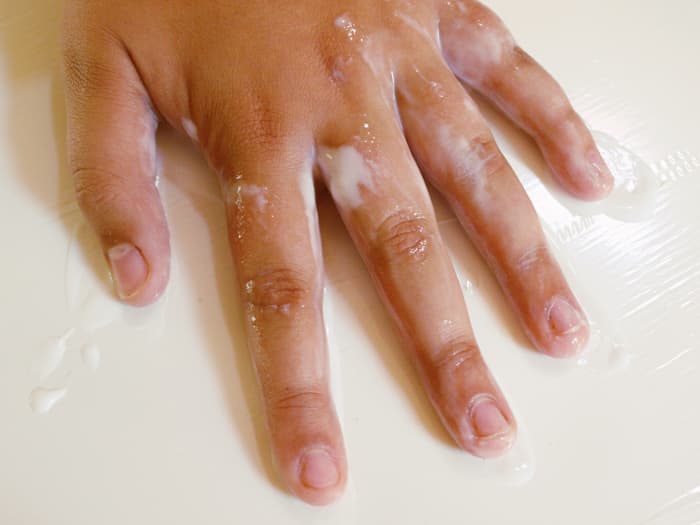
Pace Four: Apply the Imitation Claret to the Bases
You will stain your mitt with red dye during this pace, so if this is a problem, wear a latex or non-latex surgical glove.
- Holding your mitt over the plastic wrap, apply the dorsum of a spoon to pigment a thick layer of your false blood glue mixture onto it. It doesn't need to exist perfect — simply make sure it is about an 8th of an inch thick everywhere only the center of your palm.
- So, flip your hand over and printing it onto the dried patently arts and crafts glue print and pick your hand back up.
- Keep painting your paw with the bloody mixture and pressing information technology into the bases until you lot have as many bloody handprints every bit y'all'd like.
- Now, after washing off your hands (or glove) with warm soapy h2o, utilize a spoon to carefully cascade and spread more fake blood glue onto the handprints to ensure that they are all about an 8th of an inch thick.
- Permit the glue to dry until it becomes translucent earlier you advisedly peel the plastic wrap off of the blood drops and bloody hand print cling films and store them between sheets of wax newspaper, unless y'all intend to use them immediately. If y'all didn't make the mucilage mixture thick plenty to skin off in a nice, substantial cling film you can add more than layers of information technology and let them to dry again.
Also, there volition probable exist drops of blood mucilage on the plastic wrap just from what you spill or drip accidentally. If you prefer more than, just drop more colored gum in shapes yous similar an eighth of an inch thick on the plastic wrap.
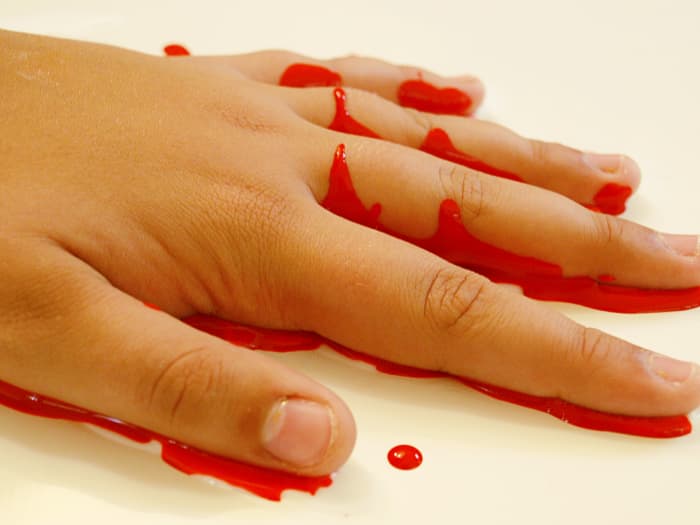
Pressing your bloody hand into the plain glue bases to effectually an 8 of an inch thick.
Press your encarmine hand into the bases and so drop whatever remaining mucilage is left to create blood drops.

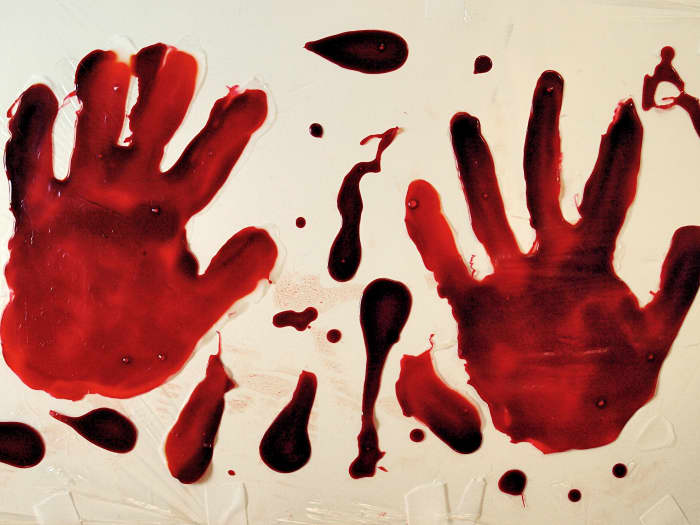
DIY bloody handprint window cling on a shower door.
Besides Much Work? Too Much Mess?
Questions & Answers
Question: How can y'all plough these bloody handprint window clings into a gel cling? I want to put them on a garage door. Does the colour come off of these wall clings?
Answer: They are non gel clings, just window clings made out of dried craft gum that stick on shine surfaces indoors. Yep, the color will drain (pun intended) if you employ them out in the conditions as they are non water resistant.
Question: Ane of the requirements was wax paper, but information technology was never used in the instructions. Where does the wax paper come up in to play in making DiY bloody handprint window clings?
Answer: The waxed paper is used to store the clings earlier and between uses. If two or more clings touch each other too long without waxed paper in between they bond together.
Question: Volition these bloody handprint window clings come off walls I keep them on for four months?
Answer: I don't recommend using them on painted walls or wallpaper at all. Utilize only on smoothen surfaces like glass or ceramics.
Question: How does the gum cling to windows and how long would this whole project take?
Reply: The mucilage clings to the window by being really smooth and very slightly tacky on the back.
The whole project takes a variable amount of time because water-based glues' dry times are afflicted by humidity. In a actually dry house, you could consummate them in less than a twenty-four hour period. In a boiling area or boiling house, the first glue layer could take days to set up.
Question: If I want to store them, how long volition these encarmine handprint window clings last?
Answer: I've been reusing some for five years, so I gauge they'll last upwards to v years.
Question: Can I use wax newspaper instead of plastic wrap to make my own window cling?
Answer: Depending on the humidity and the waxiness of the paper surface, it may or may not work. If water in the glue makes its way into the waxed paper, it will cause either wrinkling of the paper or bail the glue to the paper or both. If the paper wrinkles, the cling won't be shine and able to stick to glass. If the glue bonds to the paper, you lot won't be able to remove the cling from information technology.
franz on Oct xviii, 2017:
will try this, this coming halloween. thanks!
Kylyssa Shay (author) from Overlooking a meadow virtually Chiliad Rapids, Michigan, USA on October 16, 2017:
The white base prevents the food coloring from transferring. If you use them but on glass, ceramic, slick plastic, or polished metal surfaces yous tin can forgo the plain glue layer. Without it, they will definitely stain painted surfaces.
Alisha on October xiv, 2017:
I similar it
Evelyn on October 12, 2017:
Do you accept to use the white base, or can you merely use the cerise mixture?
Kylyssa Shay (writer) from Overlooking a meadow near Chiliad Rapids, Michigan, U.s.a. on October 26, 2016:
Yes, you tin apply the gum without dipping your hands in it; information technology'southward just easier to make the paw shape using an actual hand.
Kristi on October 24, 2016:
Could I just put the claret colored glue on without using their easily?
Kylyssa Shay (writer) from Overlooking a meadow near Thousand Rapids, Michigan, Usa on October 31, 2015:
Cheers all for reading and commenting.
@FatBoyThin My roommate and I sometimes utilize them but whenever to confuse our guests.
@FlourishAnyway Y'all're welcome. It's very messy merely quite piece of cake.
@Jordan The clear base only needs to dry to the bear upon before the red layer is added.
@Kristen Howe I'k pleased yous enjoyed information technology.
@DzyMsLizzy It's a great arts and crafts for kids. It doesn't have to turn out tidy to expect good and they love making the "mess" on purpose. Information technology's also inexpensive as heck.
Liz Elias from Oakley, CA on October 29, 2015:
Congrats on HOTD!! What an interesting idea. This would be fun. I'k sharing this on FB and Pinning, so my daughter can see it--I think the grandkids would enjoy doing this.
Kristen Howe from Northeast Ohio on October 29, 2015:
Congrats on HOTD, Kylyssa for this timely hub, since I've read it this month.
Jordan on Oct 29, 2015:
Does the base need to dry completely translucent before adding the carmine layer of paint? Thanks for your time.
FlourishAnyway from USA on October 29, 2015:
This is my kind o fun! Thanks for these creative instructions!
Colin Garrow from Inverbervie, Scotland on October 29, 2015:
Ooh! Wonderfully gory, and what an like shooting fish in a barrel style to turn your dwelling house into a crime scene. Cheers.
Kylyssa Shay (author) from Overlooking a meadow well-nigh Grand Rapids, Michigan, The states on October 20, 2015:
It is easy to remove from glass and other slick surfaces. If they've been exposed to a lot of moisture when in use, you may need to use a spatula or scraper to remove the decorations. Then you can finish cleanup with warm soapy h2o.
AR on October eighteen, 2015:
is it like shooting fish in a barrel to remove
Giovanna from UK on October xv, 2015:
Wow! What a lot of claret - love information technology! Thanks for teaching me this. Pinned :)
The Reminder from Canada on October 05, 2015:
Great hub thanks! I'one thousand tempted to effort it this calendar month
Kristen Howe from Northeast Ohio on October 05, 2015:
Great idea, Kylissa! It'due south fun and non so creepy, either. 2 bloody handprints up!
Kylyssa Shay (author) from Overlooking a meadow virtually Grand Rapids, Michigan, United states of america on September 28, 2015:
If the evidently layer of glue is thin, information technology's barely visible. Just if you want a more realistic look and are not worried about getting a little dye transfer on the surface you'll be using, yous can make a few without the plain base. The dye will come right off drinking glass surfaces with a bit of glass cleaner.
Jen on September 26, 2015:
With the beginning layer of manifestly glue, does information technology look much different than the top with the coloured glue? Like if I wanted to put these on the drinking glass on our front end door, if I put them on the inside of the door with the bottom patently layer beingness the first thing you see when you walk up, tin you tell there is a plain layer at all? Or is it completely translucent? (I hope that question makes sense! haha)
Kylyssa Shay (author) from Overlooking a meadow near Grand Rapids, Michigan, United states of america on September 13, 2015:
The comments are not threaded properly so you can't see that my comment was in response to that last 1 past an anonymous user request to apply it in a newsletter. I don't retrieve they accept any intention of plagiarizing, either, and so I responded to them every bit I did to be sure they understood what I was willing to allow and what I wasn't. I really wish the answer function threaded comments to the comment they are written in response to!
KonaGirl from New York on September thirteen, 2015:
Kylyssa, Oh no! I would never take your have your work! Pirating or plagiarize is such a bad thing to practise. I pinned this page as a tribute to your good piece of work & so I can remember where to discover it once more to attempt it out for Halloween. Hugs
Kylyssa Shay (author) from Overlooking a meadow virtually M Rapids, Michigan, USA on September 12, 2015:
Linking is greatly appreciated. All the same, please do non cut and paste the text or images. Give thanks you!
Kylee Howells on September 12, 2015:
This is great! Is it alright if I use it in my company's Oct newsletter? With credit to you and a link to your blog of form.
KonaGirl from New York on September 08, 2015:
Very cool idea for decorating our Halloween windows! I have pinned it to my "Halloween Decor" board at https://www.pinterest.com/konagirl/halloween-decor... so i tin can find it again when the time is correct.
Kylyssa Shay (author) from Overlooking a meadow nearly One thousand Rapids, Michigan, Usa on September 07, 2015:
Attempt wiping the spot where they are to cling with a clammy cloth or attempt breathing on information technology to create some condensation before reapplying. I've never had the trouble, only I live in Michigan where information technology'due south humid.
Billie on September 07, 2015:
I fabricated a couple clings to attempt information technology out. When I commencement took them off they stuck to the window. The next solar day I went to put them on again and they no longer stick. Am I doing something wrong? Or are they a one time use? Thank you for your help.
Devika Primić from Dubrovnik, Croatia on October 30, 2014:
Looks bloody indeed! A great suggestion and yous certainly know what goes.
KonaGirl from New York on Oct 29, 2014:
This is so cool. I'thousand pinning this to my Halloween Décor board.
Kylyssa Shay (author) from Overlooking a meadow nigh 1000 Rapids, Michigan, Usa on October 29, 2014:
It probably would not work or work every bit well. The Elmer's mucilage becomes translucent and stays a flake flexible. This particular homemade glue would definitely not exist as translucent when it dried and, while the sugar might make it a little hygroscopic, I doubt it would hold enough moisture to keep the flexibility that allows the clings to piece of work well.
Monique on October 29, 2014:
The gum'due south ingredients is flour, water, liquid starch, vinegar and sugar.
Kylyssa Shay (writer) from Overlooking a meadow almost Grand Rapids, Michigan, Usa on October 28, 2014:
What are the mucilage'south ingredients? I'd propose y'all try making a very tiny bit of it and see what the final consistency is like.
Monique on October 28, 2014:
Could this exist made with homemade glue?
Kylyssa Shay (author) from Overlooking a meadow near Chiliad Rapids, Michigan, USA on October 18, 2014:
If you put downward the layer of plain glue without dye in information technology first, information technology shouldn't cause staining. Information technology's the reason for that step.
Ashley on October 18, 2014:
Hey! This is really cool. Does this stuff stain surfaces like the regular gel clings? I've noted that when sticking them on the tile they stained a bit earlier, only nothing a magic eraser couldn't fix.
Kylyssa Shay (author) from Overlooking a meadow near G Rapids, Michigan, USA on Oct 13, 2014:
If yous are referring to the translucent gel type, I don't know if it would work or not equally I've never worked with no-run glue and I don't know what the finished consistency would exist like. You lot could requite it a effort using the tiniest drop of color in a dab of it and and then seeing what information technology's like when dry.
kat on October thirteen, 2014:
is elmers no run school gum okay?
Kylyssa Shay (author) from Overlooking a meadow near Grand Rapids, Michigan, USA on October 01, 2014:
When the glue has become mostly translucent rather than mostly white on virtually of the print, the glue should be dry enough to commencement applying the layer or layers of color.
Courtney Cole on October 01, 2014:
When will I know when the base is dry enough? Making them right now and base has been drying for most twoscore minutes
Corrinna Johnson from BC, Canada on September 26, 2014:
Love this thought! I volition have to endeavour to brand these this yr. Corking tutorial and crawly instructions.
Kylyssa Shay (author) from Overlooking a meadow near Grand Rapids, Michigan, USA on September 23, 2014:
I have no idea. Anything that would change the texture of the dried glue might interfere with its ability to stick to slick surfaces. The but way to find out is to endeavor it. You could mix up a tiny bit and see how it works out.
Jessica on September 23, 2014:
Do you think you could utilize washable craft paint instead of nutrient coloring?
Kylyssa Shay (author) from Overlooking a meadow nearly Grand Rapids, Michigan, USA on September 18, 2014:
It depends a lot on the humidity and temperature of the room where you are using them. I left a pocket-sized ane on my bathroom mirror for a few months. If they become dry out and start to autumn off, you can refresh them by peeling them off, putting them on plastic wrap or waxed paper, and letting them sit down in the bathroom while you take a steamy shower.
Courtney Cole on September 18, 2014:
How long do they stick to stuff for? Like if I made them at the beginning of october, would they withal be sticking to my window by Halloween?
Kylyssa Shay (writer) from Overlooking a meadow near Yard Rapids, Michigan, USA on September 09, 2014:
Once the liquid evaporates from the glue the clings don't seem prone to melting. If anything, they tend to get brittle over time. I oasis't stored them anywhere hot but I did have some on windows that got direct sunlight for a few weeks without any melting. I'm non 100% sure storing them somewhere it gets over 80 or so consistently wouldn't degrade them or melt them merely it seems unlikely. If they did melt and stick to the wax paper, you could probably pop them into a refrigerator for a few minutes and go them loose.
Helen on September 08, 2014:
just curious. When you put it betwixt the wax paper and store it, In the summer if it is to hot, would the glue melt?
vmaker on May 25, 2014:
You can ofttimes remove dye from your hands with vegetable/canola oil. I haven't tried it with the blood-red food coloring, but information technology would be worth checking it out.
Ruthi on September 24, 2013:
What fun! I like the idea of bloody Halloween hand prints. Thank you for great instructions on how to brand the handprint clings!
CharMarie on September 22, 2013:
What a great idea! I've seen someone utilise these for their Halloween decorations! It looked great!
bearding on September 16, 2013:
Perfect, definitely going to be doing this, simply making our own blueprint of a pentagram.
julieannbrady on August 02, 2013:
Hey there! This is a encarmine expert DIY - I bet I could really scare my neighbors!
Ann Hinds from So Cal on October 23, 2012:
OK, I love this and will be making information technology before we go camping this weekend at our tenth annual Spooktacular in Tucson. We always decorate our vintage trailers for Halloween and this is a really great idea. You have made information technology look easy. Blessed!
Pinkmaddy LM on October 23, 2012:
I'g definitely going to try this with my son. He'll love this!
Mary Stephenson from California on October 22, 2012:
I am sure boys would love to do that and maybe not then young boys! Don't think I would want that on my windows, but a brilliant idea for those of the morbid nature.
Virginia Allain from Primal Florida on Oct 22, 2012:
ugh... very realistic looking. I'll characteristic this on my 101 Ideas for Haunted Houses.
Eileen from Western Cape , South Africa on October 22, 2012:
Fascinating thought and and so creative .
lewisgirl on Oct 21, 2012:
Very Creative!
Fine art Inspired on October 21, 2012:
Fun idea. Thanks for sharing! Have a Happy Halloween.
anonymous on October xviii, 2012:
@Kylyssa: Thank y'all so much for your thorough & prompt response! I'm off to try a batch & I'll be sure & let you know if we terminate upwardly using information technology for my party. Have a lovely twenty-four hours!
Kylyssa Shay (author) from Overlooking a meadow about Grand Rapids, Michigan, Us on October 17, 2012:
@anonymous: In normal weather, y'all can put the blood glue layer on after well-nigh 40-five minutes to an hour. It takes less time if information technology's dry where you are working and can take a long fourth dimension if humidity is high. The ones I fabricated to take the photos were prepare to put on the windows in less than two hours from the time I get-go touched glue to plastic wrap.
The thickness is needed to create a thicker, stronger, and less brittle finished production. Using multiple layers of glue to accomplish that thickness speeds up the drying fourth dimension immensely. A single very thick layer could take as long as a day to dry. Information technology may also spread out and blur the paw shape way more than you'd like, especially since your bloody glue volition be a footling thinner and take a little longer to dry out than plain glue.
Using obviously glue for the base makes it so you don't accept to brand up as much claret colored mucilage. It likewise reduces the incidence of transferring crimson food dye to surfaces and reduces the chances of dripping blood colored gum where you don't want information technology simply because yous handle less claret mucilage that way. I've establish the clear layer gives the finished production a nice translucency that compensates for the thickness required to make the hand prints sturdy.
anonymous on October 17, 2012:
I love this idea and so much! I'one thousand thinking nigh having a table set up for making these at my 5th annual pumpkin etching party. Could you answer a few quick questions?Nearly how long do y'all need to wait in between the manifestly gum & the cerise gum? About how long does it have overall? What is the reason for the 2 stride procedure?
Kylyssa Shay (writer) from Overlooking a meadow near Grand Rapids, Michigan, U.s.a. on Oct 06, 2012:
@bearding: As long every bit you don't have carpeting or woods floors there's no reason you lot couldn't. I simply happen to have an apartment full of carpeting that stains similar nobody's concern but if I had linoleum I would put the fake blood glue directly on the windows.
anonymous on October 06, 2012:
Very absurd! Can you apply the glue directly to the window, and and so later when you lot're finished using it, scrape or peel it off?
Kirsti A. Dyer from Northern California on September 08, 2012:
I added your Bloody Handprint directions lens as a link from my decorating Encarmine Spectacles lens.
Deborah Swain from Rome, Italy on August 30, 2012:
fantastic! you can make cobwebs in a similar mode - they're a bit fiddly with the webbing but the PVA glue on plastic technique is the same!
Genesis Davies from Guatemala on August 29, 2012:
Skillful idea! I want to try this with other shapes for other holidays like Valentine's Day.
Susan Deppner from Arkansas Us on August 27, 2012:
Very cool Halloween craft! Congratulations on being featured on Squidoo's Happy Halloween magazine!
Lynda Makara from California on August 26, 2012:
Pretty creepy--I love information technology! Angel blessings.
LoriBeninger on August 26, 2012:
I take to try these! How clever.
Kylyssa Shay (writer) from Overlooking a meadow near 1000 Rapids, Michigan, The states on Baronial 26, 2012:
@BarbaraCasey: They stick to any smooth surface.
BarbaraCasey on August 26, 2012:
Practise the hand prints stick on the glass all by themselves? I've never used window clings before. Really fun lens.
gatornic15 on August 25, 2012:
This is a neat thought! Your footstep-by-step instructions and pictures make this project like shooting fish in a barrel for others to do. Blest
Kylyssa Shay (author) from Overlooking a meadow near 1000 Rapids, Michigan, United states of america on Baronial 25, 2012:
@kburns421 lm: I'd be delighted to have any of my Squidoo lenses pinned. Give thanks you!
kburns421 lm on August 25, 2012:
Actually, do yous listen if people pin your stuff? (I know some people don't like it.) I call back yous could bring in more traffic through Pinterest, and I'd gladly pin it.
kburns421 lm on August 25, 2012:
This is and then cool! I've used window clings and window gels, but I didn't know information technology was so simple to make my own. I mean, clearly it takes some work and is messy, only I didn't fifty-fifty know it was possible. Yours came out awesome, past the way.
Expat Mamasita from Thailand on August 24, 2012:
I love information technology! Very creative :-)
flycatcherrr on August 24, 2012:
This is zip curt of an crawly arts and crafts/decoration! My windows will exist sporting a few bloody handprints this Halloween, for certain.
Source: https://feltmagnet.com/crafts/do-it-yourself-bloody-handprint-window-clings
Posted by: hillparented.blogspot.com
0 Response to "How To Make Window Clings At Home"
Post a Comment